What the?
Lefsa.
It's a Norwegian pastry type or maybe bread type thing, and it's one of those sweet things that has been traditionally made and enjoyed by many Norwegian families over the Christmas holiday since time Scandinavian immortal. Every family has some sort of tasty treat they make for the holiday. You know, Christmas sugar cookies in every shape imaginable decorated with all sorts of colorful chemical stuff, Aunt Marge's Fruit Cake, Fudge, Aunt Betty's Fudge Fruit Cake, Lefsa. See how easy it fits in?
Mrs. Antonson's Lefsa recipe, which is the only one I have ever known, comes direct from Norway via Ketchikan,
Alaska, where my Mother was born to two Norwegian immigrants. Mrs. Antonsen was a neighbor, apparently, and part of a
clan that migrated to that particular spot in America from the home
country.
The only recipes I have seen for Lefsa use potato as an ingredient. As a matter of fact, I have seen a gazillion recipes for potato Lefsa(e). I
have even sampled a few here and there. But in
my opinion, nothing compares with Mrs. Antonson's Lefsa. This recipe is something completely different
and absolutely fabulous. It is for this reason that I will be keeping some of the ingredients and the amounts thereof under cover. I may have plans to take the old country by storm with my own brand of Lefsa madness, one of these days. Maybe. Besides, you don't have the rolling pin nor the fortitude to make the forthcoming mess. Trust me.
It takes a while to make, and it is not for the challenged
chef. You’ll also get a good workout in
during the rolling procedure. If done
correctly, your shoulders and forearms should ache when you’re finished. You really almost have to have some Norwegian
blood in you to deal with all the hoopla involved.
It’s been a Christmas holiday tradition in our family since forever and I’ve
only missed a couple years of making it since I took over the reins from my Mother
in the mid-1970’s. As a matter of fact,
back in the late 1970’s, when my older brother and I still drank, we’d spend a
Saturday in early December destroying someone’s kitchen. Usually mine.
We’d start about eight in the morning, both with the recipe
and beer. We’d usually 8x the recipe
too, ensuring we’d have fun for hours and Lefsa for days.
By the time we were done, (including whacking a few dough balls with a
tennis racquet one memorable year) we pretty much needed a fire
hose to clean up the mess. That's usually why my lovely wife would go shopping all day when we made it.
You’ll need a big work place too. You’ll be ultimately rolling oval sheets of
dough to potentially 10”x18”. You’ll
need a large, flat, floured surface and a pancake griddle to cook
the sheet for a couple minutes once rolled.
Then you’ll need a place to stack the sheets of Lefsa once they’re
cooked.
You’ll also need a rolling pin, the bigger the better. I actually have a Lefsa rolling pin that was
my Grandmothers. It's older than me. It is solid wood, 17”
wide, and has an indented grid pattern all round. The pattern will add character to your
finished product, however, it is not necessary to actually accomplish the end
result. However, if you don't make your Lefsa with the grid pattern people will know you aren't Norwegian.

Making Lefsa is a good two-person project. One person can start to roll dough balls into a
flat sheet, the other can take it from there to really roll it thin. Then one can start throwing dough balls at the other. Then the other one can shake up an unopened beer and saturate the other. Are you getting the picture
here?
Total kitchen chaos. But when you are ultimately finished, you will have a soft,
flat, velvety dough or bread enfolding a luscious, creamy cinnamon-sugar butter. It literally melts in your mouth! But it is a lot of work, especially with a helper. The kitchen will be destroyed and you'll probably end up really wet and very sticky. With flour in your hair. Not a flower. Maybe you should just go to the movies instead.
First you mix together sugar, corn syrup, evaporated milk and another secret ingredient. Once blended you add a couple cups of flour that's been infused with some other secret ingredients.

Once that is blended, then you begin to add ½ -1 cup of flour at a time, kneading with your hands to finally make a semi-hard, rubbery dough. It is generally a pretty sticky situation and one that does not lend itself to taking photographs easily. Cleanly either.

Then make a ball of dough, somewhere between the size of a
golf ball and a tennis ball. Roll it
until it’s firm in your hands, then put on floured surface and begin to roll
flat with your rolling pin. Flip and
roll, adding flour as necessary so it does not stick. You want this sheet as thin as you can get
it. 1/8”? 1/16”? 1/32”?
I mean THIN!! If there ever was a complaint from my Mother or my late Uncle Andy
it was because the sheet wasn’t thin enough. I
cannot stress this enough, ok?? Thin! Work those shoulders thin. It should finally
become an avant-garde or imperfect oval shape of around 10-12” wide by 14-16”
long.
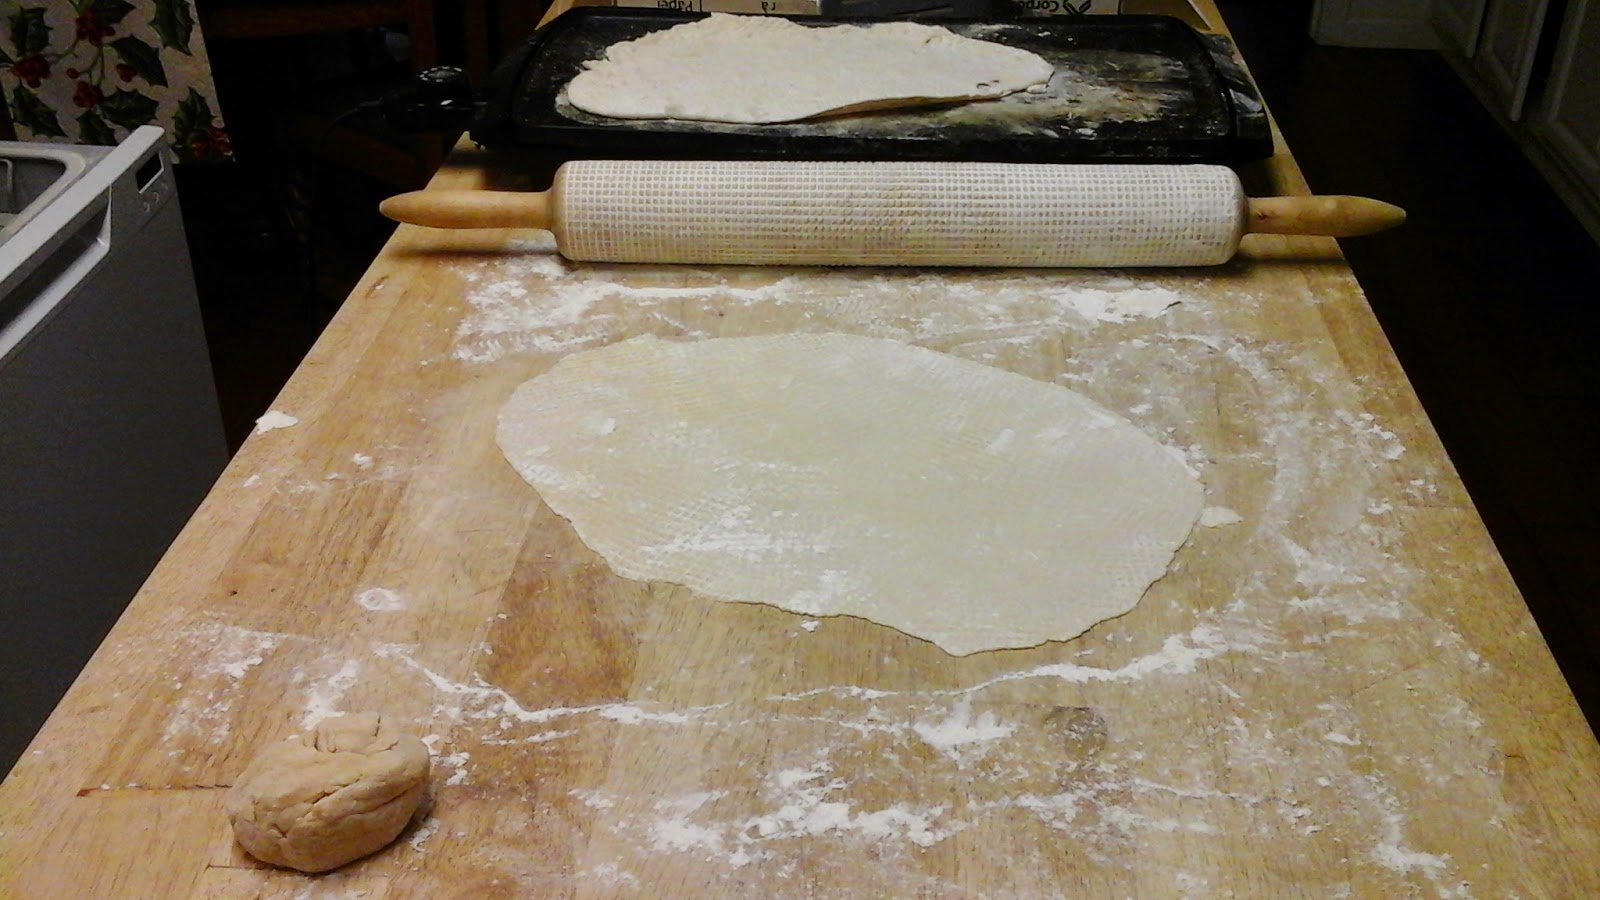
You'll notice the rolling pin was floured before using. This is very important if you have a rolling pin with a grid pattern. Otherwise you could spend the better part of the next year trying to get it clean. Trust me on this. This dough is really, really sticky. You'll have to continually add flour to your rolling surface too. This is why it gets so messy...flour somehow ends up everywhere!
Once you think you have your sheet thin enough, roll it again, paying special attention to the edges, which seem to grow (sometimes). Then it's time to cook it on one side. The sheet of Lefsa at this stage is quite flimsy, especially if you got it thin enough. I use two items to lift it and get it over to the griddle. Two spatulas will do, however I'm snooty and use a Lefsa stick for half my lift. Get both underneath the sheet, elevate and then gently lay onto your 350 degree griddle. The sheet of Lefsa doesn't always fall clean, so then you must massage and finesse the edges so the sheet lays flat on the griddle.

Cook ONE SIDE ONLY, about 2-4
minutes, until lightly browned. Little bubbles will appear on the top


The sheet is a lot more sturdy at this point, you can take off
the griddle with your hands or feet and start stacking! The sides
may curl a little, this is normal. Once
cooled, this thin sheet will become hard and can be brittle. Handle with care. At this stage, it’ll last forever, or at
least a year. Whichever is longer.
Now, let's complete this masterpiece. But first, let's clean the kitchen. This could take the rest of the day, depending on how much beer you drank. Once the kitchen is cleaned, it'll probably be time for a nap. Maybe you should wait to butter it until the next day.
Fortunately, now that the pastry is done, it can sit as is until you want to "butter" it up. We always used to “wing” the butter, which could be
extremely time consuming adding this and that, tasting, then adding a little
more. Of this or that. By the time you think you got it
perfect your taste buds have gone south from the cinnamon, butter and beer and
you’re no where close. So you start over
again, at least with another beer to wash all that sweet taste out of your
mouth.
My darling daughter and I finally concocted a cinnamon sugar butter recipe with some very
measured and concise taste tests. This
recipe received my Mother’s approval before she died, and since she was the only remaining family Lefsa scion, that was the only vote that really mattered. Unfortunately, by the time we got around to
writing it down Uncle Andy had passed on.
Basically you combine the three in measured amounts and whip in your Kitchenaid for a while. Until whipped and frothy.
Then the fun begins. Get a few hand towels or bath towels, whatever, and place one down on your work area. Take
a sheet of Lefsa and moisten the COOKED SIDE ONLY. Just place it under your kitchen faucet and allow warm running water to cover the entire cooked surface. Moisten every square inch! Then place it on a towel and cover with another
towel.

Moisten another sheet and so
on. The butter recipe I use will cover 8-9 sheets, so that is what I'll usually moisten. Then let them sit for 10-15 minutes and allow the Lefsa to soften. Sometimes if the sheets are a few months old you might
have to re-moisten.
Take a now soft sheet of Lefsa and place it cooked side up
on a cutting board. Butter ½ the sheet,
then fold the unbuttered half over the top of the buttered half. You now have made a sandwich. Or a burrito.


Remember this is imperfect.
You will have spots here and there on the edges that are open and uncovered. Take a knife and trim the edges so they’re
clean. Put these on one plate.

Once the edges are clean (and remember, don’t worry about
the shape) then you can slice up pieces of Lefsa from what’s remaining. You should be able to come up with 6 to 8 clean pieces per sheet,
about the size of a basic cookie, only with 3,4,5 or 6-sided shapes. Doesn’t matter.

When my mom did this, the clean edge pieces were used as
gifts and for the holiday occasion. We were told, under no uncertain terms, HANDS OFF!
However, the cut-off edges were open hunting and were usually gobbled up
before they hit the plate. Our entire
family, including cousins, and my dear Uncle Andy always remember the edges as
the best part. I am also incredibly happy to say this tradition has now been passed on. This year as I cut the Lefsa both children and grandchildren hovered. Those scraps never had a chance.
All right, that’s it.
If you got this far (without actual ingredients) I hope you enjoy this tasty treat as much as our family has for decades. If not, I hope you enjoy Aunt Betty's Fudge Fruit Cake, or whatever the tasty treat is that has graced your family for the holidays. Hope your Christmas was Merry. Happy New Year.